Как установить NextCloud 21 на Ubuntu Server 20.04 с помощью Nginx, PHP-FPM, MariaDB и Redis
Это руководство предназначено для ручной установки NextCloud 21 на новый сервер Ubuntu 20.04 с использованием Nginx, MariaDB и PHP 7.4; и Redis для кэша памяти.
1. Установите зависимости
Прежде всего, установите зависимости. Начнем с Nginx (веб-сервер) и MariaDB (движок базы данных, эквивалентный MySQL).
Обратите внимание , что я запускаю команды, показанные ниже, из командной строки root. Если у вас нет прав root, не забудьте использовать sudo для команд установки пакетов и т. д.
apt update
apt install nginx mariadb-server
Теперь PHP, Redis и различные модули.
apt install php7.4 php7.4-fpm php7.4-common php7.4-gd php7.4-curl php7.4-zip php7.4-xml php7.4-mbstring php7.4-intl php7.4-imap php7.4-bcmath php7.4-redis php7.4-mysql php7.4-gmp php7.4-imagick redis imagemagick
2. Настройка SQL и создание базы данных
Защитите сервер MariaDB. Введите следующую команду и следуйте инструкциям. Установите пароль root для сервера SQL, но в остальном примите все значения по умолчанию.
mysql_secure_installation
Теперь войдите в командную строку mysql и создайте базу данных Nextcloud и пользователя. Замените общий пароль, показанный ниже, своим собственным и запишите его. Приведенные ниже команды создают базу данных и пользователя, разрешают все привилегии в базе данных указанному пользователю, применяют изменения привилегий и выходят из командной строки sql.
mysql -u root -p
MariaDB [(none)]> CREATE DATABASE nextcloud;
MariaDB [(none)]> CREATE USER 'nextcloud'@'localhost' IDENTIFIED BY 'Your_Strong_Password';
MariaDB [(none)]> GRANT ALL ON nextcloud.* TO 'nextcloud'@'localhost' IDENTIFIED BY 'Your_Strong_Password';
MariaDB [(none)]> FLUSH PRIVILEGES;
MariaDB [(none)]> exit
3. Загрузите и распакуйте NextCloud
Посетите страницу загрузки пакета сервера NextCloud и скопируйте ссылку с большой синей кнопки «Загрузить Nextcloud».
На своем сервере загрузите ZIP-файл с помощью wget. (Очевидно, замените ссылку, показанную ниже, на текущую.)
wget 'https://download.nextcloud.com/server/releases/nextcloud-21.0.1.zip'
Установите утилиту unzip и разархивируйте файл. Переместите разархивированную папку в каталог веб-сервера и установите разрешения и владельца.
apt install unzip
unzip nextcloud nextcloud-21.0.1.zip
mv nextcloud /var/www/
chown -R www-data:www-data /usr/share/nginx/nextcloud
4. Настройте Nginx
Теперь создайте файл конфигурации Nginx.
touch /etc/nginx/sites-available/nextcloud
При необходимости внесите изменения в эту конфигурацию (измените имя хоста сервера и убедитесь, что путь к корневому каталогу веб-приложения правильный) и вставьте в файл конфигурации. Сохранить и выйти.
upstream php-handler {
    #server 127.0.0.1:9000;
    server unix:/run/php/php7.4-fpm.sock;
}
server {
    listen 80;
    listen [::]:80;
    server_name cloud.example.com;
    # Enforce HTTPS
    return 301 https://$server_name$request_uri;
}
server {
    listen 443      ssl http2;
    listen [::]:443 ssl http2;
    server_name cloud.example.com;
    # Use Mozilla's guidelines for SSL/TLS settings
    # https://mozilla.github.io/server-side-tls/ssl-config-generator/
    ssl_certificate     /etc/ssl/certs/ssl-cert-snakeoil.pem;
    ssl_certificate_key /etc/ssl/private/ssl-cert/snakeoil.key;
    # HSTS settings
    # WARNING: Only add the preload option once you read about
    # the consequences in https://hstspreload.org/. This option
    # will add the domain to a hardcoded list that is shipped
    # in all major browsers and getting removed from this list
    # could take several months.
    #add_header Strict-Transport-Security "max-age=15768000; includeSubDomains; preload;" always;
    # set max upload size
    client_max_body_size 512M;
    fastcgi_buffers 64 4K;
    # Enable gzip but do not remove ETag headers
    gzip on;
    gzip_vary on;
    gzip_comp_level 4;
    gzip_min_length 256;
    gzip_proxied expired no-cache no-store private no_last_modified no_etag auth;
    gzip_types application/atom+xml application/javascript application/json application/ld+json application/manifest+json application/rss+xml application/vnd.geo+json application/vnd.ms-fontobject application/x-font-ttf application/x-web-app-manifest+json application/xhtml+xml application/xml font/opentype image/bmp image/svg+xml image/x-icon text/cache-manifest text/css text/plain text/vcard text/vnd.rim.location.xloc text/vtt text/x-component text/x-cross-domain-policy;
    # Pagespeed is not supported by Nextcloud, so if your server is built
    # with the `ngx_pagespeed` module, uncomment this line to disable it.
    #pagespeed off;
    # HTTP response headers borrowed from Nextcloud `.htaccess`
    add_header Referrer-Policy                      "no-referrer"   always;
    add_header X-Content-Type-Options               "nosniff"       always;
    add_header X-Download-Options                   "noopen"        always;
    add_header X-Frame-Options                      "SAMEORIGIN"    always;
    add_header X-Permitted-Cross-Domain-Policies    "none"          always;
    add_header X-Robots-Tag                         "none"          always;
    add_header X-XSS-Protection                     "1; mode=block" always;
    # Remove X-Powered-By, which is an information leak
    fastcgi_hide_header X-Powered-By;
    # Path to the root of your installation
    root /var/www/nextcloud;
    # Specify how to handle directories -- specifying `/index.php$request_uri`
    # here as the fallback means that Nginx always exhibits the desired behaviour
    # when a client requests a path that corresponds to a directory that exists
    # on the server. In particular, if that directory contains an index.php file,
    # that file is correctly served; if it doesn't, then the request is passed to
    # the front-end controller. This consistent behaviour means that we don't need
    # to specify custom rules for certain paths (e.g. images and other assets,
    # `/updater`, `/ocm-provider`, `/ocs-provider`), and thus
    # `try_files $uri $uri/ /index.php$request_uri`
    # always provides the desired behaviour.
    index index.php index.html /index.php$request_uri;
    # Rule borrowed from `.htaccess` to handle Microsoft DAV clients
    location = / {
        if ( $http_user_agent ~ ^DavClnt ) {
            return 302 /remote.php/webdav/$is_args$args;
        }
    }
    location = /robots.txt {
        allow all;
        log_not_found off;
        access_log off;
    }
    # Make a regex exception for `/.well-known` so that clients can still
    # access it despite the existence of the regex rule
    # `location ~ /(\.|autotest|...)` which would otherwise handle requests
    # for `/.well-known`.
    location ^~ /.well-known {
        # The rules in this block are an adaptation of the rules
        # in `.htaccess` that concern `/.well-known`.
        location = /.well-known/carddav { return 301 /remote.php/dav/; }
        location = /.well-known/caldav  { return 301 /remote.php/dav/; }
        location /.well-known/acme-challenge    { try_files $uri $uri/ =404; }
        location /.well-known/pki-validation    { try_files $uri $uri/ =404; }
        # Let Nextcloud's API for `/.well-known` URIs handle all other
        # requests by passing them to the front-end controller.
        return 301 /index.php$request_uri;
    }
    # Rules borrowed from `.htaccess` to hide certain paths from clients
    location ~ ^/(?:build|tests|config|lib|3rdparty|templates|data)(?:$|/)  { return 404; }
    location ~ ^/(?:\.|autotest|occ|issue|indie|db_|console)                { return 404; }
    # Ensure this block, which passes PHP files to the PHP process, is above the blocks
    # which handle static assets (as seen below). If this block is not declared first,
    # then Nginx will encounter an infinite rewriting loop when it prepends `/index.php`
    # to the URI, resulting in a HTTP 500 error response.
    location ~ \.php(?:$|/) {
        fastcgi_split_path_info ^(.+?\.php)(/.*)$;
        set $path_info $fastcgi_path_info;
        try_files $fastcgi_script_name =404;
        include fastcgi_params;
        fastcgi_param SCRIPT_FILENAME $document_root$fastcgi_script_name;
        fastcgi_param PATH_INFO $path_info;
        fastcgi_param HTTPS on;
        fastcgi_param modHeadersAvailable true;         # Avoid sending the security headers twice
        fastcgi_param front_controller_active true;     # Enable pretty urls
        fastcgi_pass php-handler;
        fastcgi_intercept_errors on;
        fastcgi_request_buffering off;
    }
    location ~ \.(?:css|js|svg|gif)$ {
        try_files $uri /index.php$request_uri;
        expires 6M;         # Cache-Control policy borrowed from `.htaccess`
        access_log off;     # Optional: Don't log access to assets
    }
    location ~ \.woff2?$ {
        try_files $uri /index.php$request_uri;
        expires 7d;         # Cache-Control policy borrowed from `.htaccess`
        access_log off;     # Optional: Don't log access to assets
    }
    # Rule borrowed from `.htaccess`
    location /remote {
        return 301 /remote.php$request_uri;
    }
    location / {
        try_files $uri $uri/ /index.php$request_uri;
    }
}
Создайте символическую ссылку на этот файл в каталоге Nginx «sites-enabled», чтобы включить веб-сайт.
cd /etc/nginx/sites-enabled/
ln -s ../sites-available/nextcloud
systemctl reload nginx
5. Запустите установку NextCloud
Если вы настраиваете это в своей локальной сети, вам нужно добавить запись A на свой DNS-сервер, указывающую доменное имя вашего облачного сервера на IP-адрес вашего сервера Nextcloud. В зависимости от настройки вашей сети это может быть сделано на вашем маршрутизаторе или на вашем сервере Windows, если у вас настроена сеть домена Active Directory. На этом этапе вы сможете получить доступ к своему адресу «cloud.example.com» в своем браузере и настроить NextCloud.
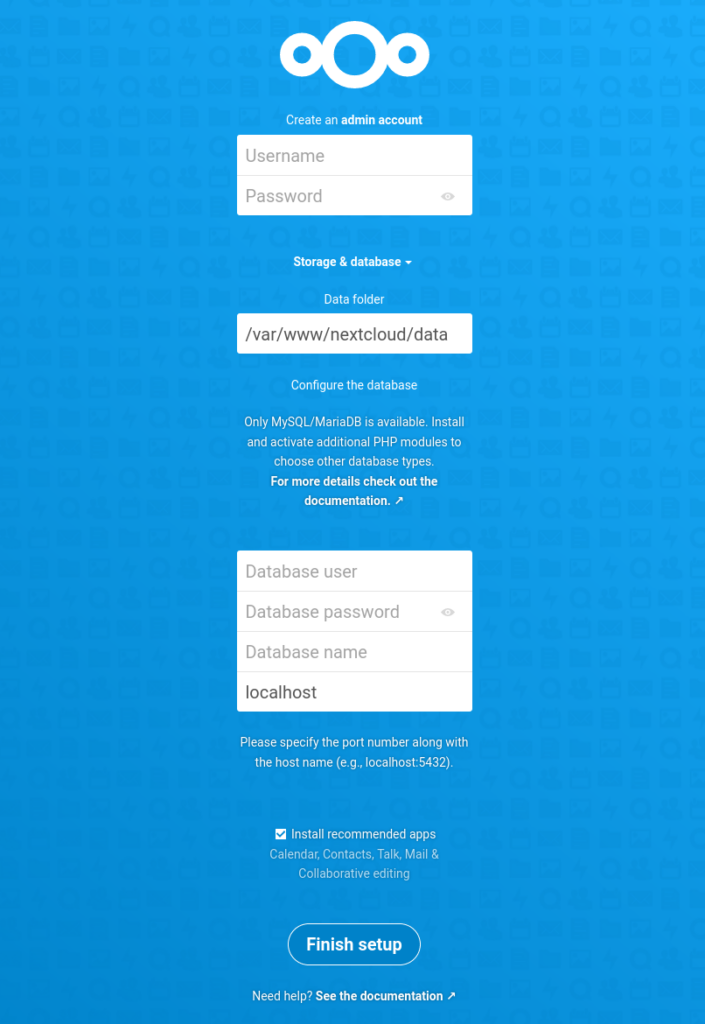
Укажите имя пользователя и пароль администратора, как указано. Каталог данных выходит за рамки этой основной статьи; если вы хотите хранить свои данные в другом месте, вы можете, но если вы не уверены, оставьте это значение по умолчанию.
В разделе «База данных» введите nextcloud в качестве пользователя базы данных и пароль, который вы указали во время установки в приглашении MySQL. Введите nextcloud в качестве имени базы данных и оставьте для базы данных значение по умолчанию, localhost. Нажмите «Завершить настройку».